Template development guide
This manual it intended to help developers to create custom or brand new storefront templates for AbanteCart. We try to make development with AbanteCart easy and fun, and this guide to make this process very clear and efficient.
If something is missing or not clear, please let us know of feel free to contribute in manual improvement.
This manual assumes that you have HTML/CSS/PHP knowledge and you have reviewed AbanteCart glossary and basic architecture.
If you just start, you will be pleased to know that we have developed a special extension for developers (Developer Tools).
Developer Tools extension will save you time to clone templates and build (archive) final extension archive. Final archive is used for extension distribution and install in AbanteCart admin.
Be fair! Developer Tools extension is under constant improvement, so feel free to help and contribute.
Clone Storefront Templates
Fastest way to build new template or customize "default" template is to clone template with Developer Tools extension.
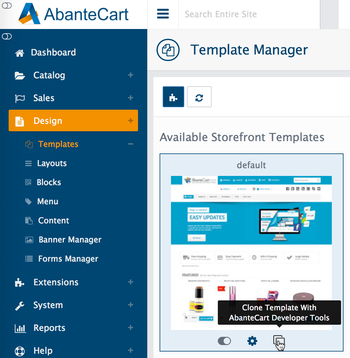
There are two template cloning options:
- full clone
- partial clone.
If you develop new template and plan to edit template ".tpl" files, you will need a full clone. It will copy all the template files.
Partial clone will copy only CSS, JavaScript and images. This is helpful if you only plane to change style for the template
note
Important to note that if new template does not have specific template/file present, "default" template file will be used. Remember to keep "default" template files intact and accessible all the time. Your clone templates will not be effected during minor updates.
When you clone, you can choose to create a core template or an extension template. We recommend to create template extensions, but if you have a specific project and do not intend to redistribute this template, you can create core clone.
It is important to make sure that directory for cloned template have complete rules to write files (777). For template extension clone, you need to set /extensions/ directory to 777 and for core template clone set /storefront/view/ directory to 777.
After clone is completed, you will see new directory created in /extensions/ or /storefront/view/
Also, you will see new template available in design/templates section. You can now enable extension template (if cloned as extension) and set new template to storefront.
Now we have a template to work with, we can start exploring and editing files
Let's note that AbanteCart storefront pages are constructed of templates and these templates are called "blocks". Each block has a corresponding entry in the database.
There is a main template file common/page.tpl that collects all the main parent blocks together organizing them into layout. This template file includes the following template files that are also blocks.
common - common folder
- head.tpl - head template file
- header.tpl - header template file
- footer.tpl - footer template file
- column_left.tpl - left column template file
- column_right.tpl -
- header_bottom.tpl -
- content_top.tpl -
- content_bottom.tpl -
- footer_top.tpl -
These template files have corresponding block names and considered to be special:
'header',
'header_bottom',
'column_left',
'content_top',
'content_bottom',
'column_right',
'footer_top',
'footer',
'content'
templates/blocks are loaded for every storefront page and put all their children blocks together to construct page layout.
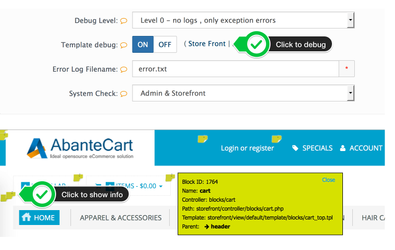
To see where these templates/blocks are shown in action, enable template debug in admin and click storefront link
About Layouts:
Layouts are explained in template overview section. Layouts are loaded with layout.xml file that can be loaded in the installation script (install.php) with simple function call below.
$file = DIR_EXT . '/simply_stylish/layout.xml';
$layout = new ALayoutManager('default');
$layout->loadXml(array('file' => $file));
See an example of layout.xml
About Blocks:
Children Blocks are standalone elements that are linked to some parent block and the layout for specific page/template combination.
Single block can be linked to multiple layouts or templates.
Each block is identified by block_txt_id. Duplicate blocks with same "block_txt_id" will not be allowed
To make sure that your block does not have conflicting block_txt_id with any other block, create a unique 'block_txt_id'.
In event, you load new block via XML layout, and same "block_txt_id" block already available, existing block ID will be used instead of your block and linked to your layout.
It is recommended to use unique "block_txt_id" if you need to make sure you use your specific block.
To lean more about AbanteCart architecture, see this page
Reusing or extending block
If you need to reuse (include) or extend functionality of existing block from "default" template, you can do it.
There are 3 Options for reusing existing blocks provided by default template.
1. You can reuse existing common block. If you need custom template (.tpl) file for this block, you can provide an override template in same virtual location in your extension.
<block>
          <block_txt_id>menu</block_txt_id>
          <templates>
            <template>
              <parent_block>header</parent_block>
              <template_name>blocks/your_menu_top.tpl</template_name>
            </template>
          </templates>
          <status>1</status>
          <position>20</position>
</block>
2. You can reuse existing common block and provide override for controller in same virtual location of extension.
<block>
          <block_txt_id>currency</block_txt_id>
          <controller>blocks/ext_txt_id_currency</controller>
          <templates>
            <template>
              <parent_block>header</parent_block>
              <template_name>blocks/currency.tpl</template_name>
            </template>
          </templates>
          <status>1</status>
          <position>40</position>
</block>
3. You can reuse existing common block and hook into controller of the block to extend functionality. hook
public function onControlleBlocksCurrency_InitData(){
		$this->baseObject->view->addHookVar('your_var_name', 'some value');
	}
hook will add new variable to block's template.
Then create block tpl for example blocks/currency.tpl and get variable
$this->getHookVar('your_var_name');
New block
If you provide new block, it must include set of controller and template. In some cases, you might need a modal if special data load is required for your new block.
Examples of block inclusion in layout XML
<block>
<block_txt_id>language</block_txt_id>
</block>
<block>
                    <block_txt_id>somename_language</block_txt_id>

                    <controller>blocks/somename_language</controller>

                    <templates>

                        <template>

                            <parent_block>header</parent_block>

                            <template_name>blocks/somename_language.tpl</template_name>

                        </template>

                    </templates>
</block>
<block>
                    <block_txt_id>somename_language</block_txt_id>

                    <controller>blocks/somename_language</controller>

                    <templates>
                        <template>
                            <parent_block>header</parent_block>

                            <template_name>blocks/somename_language.tpl</template_name>
                        </template>
                    </templates>
</block>
<block>
		<action>delete</action>
        <block_txt_id>somename_language</block_txt_id>
</block>
Managing blocks in admin layout:
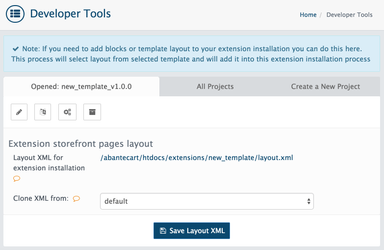
There is a lazy way to create layouts/blocks in the template while you develop. You can use admin drag & drop tools to create page layout. Once you complete, you can use Dev Tools extension to export layout and include in your extension installation.
Storefront menu
There is a navigation menu and categories menu available in AbanteCart storefront. Storefront navigation menu is constructed in common/menu.php controller and categories menu is constructed in common/category.php
If you need to build custom menu, you can provide override for these controllers or hook into controller to substitute template variables stack.
You can use built in features to debug AbanteCart templates and core execution.
Debugging Templates:
[Link to page] -> create new page with instructions to debug AbanteCart
Debugging AbanteCart
[Link to page] -> create new page with instructions to debug AbanteCart
Creating head, header and footer.
Head HTML is built and displayed in common/head.tpl
In your custom common/head.tpl template, you must include some components that are produced by core code.
These are: metadata, template debug CSS, additional styles code, and scripts
Example of common/head.tpl github
Similar to head, there is a core code in footer.tpl that will need to be present.
Example of common/footer.tpl github
In the header or footer you can include local or external components to be loaded. This is the same as you would do in regular HTML.
<link href="<?php echo $this->templateResource('/stylesheet/template.css'); ?>" rel="stylesheet" type='text/css' />
<script type="text/javascript" defer src="<?php echo $this->templateResource('/javascript/template.js'); ?>"></script>
Location of blocks in header/footer/content
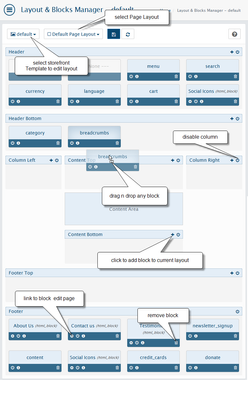
You can build a layout for your template using Admin drag&drop page for layout. Later you can use created layout with developer tools to generate layout.xml
Adding banners to your template.
Banners are set in the admin design -> Banner manager. You can include your banner block and custom template with the layout.xml. If you want to load banners content automatically with template/extension installation, you will need to create insert SQL in install.sql or PHP code in install.php
<block>

          <custom_block_txt_id>mytemplate_bannerslider</custom_block_txt_id>

          <kind>custom</kind>

          <type>banner_block</type>

          <block_descriptions>

            <block_description>

              <language>english</language>

              <name><![CDATA[Main Page Banner Slider]]></name>

              <title><![CDATA[Main Page Banner Slider]]></title>

              <block_wrapper><![CDATA[blocks/banner_slider.tpl]]></block_wrapper>

              <block_framed><![CDATA[0]]></block_framed>

              <description><![CDATA[]]></description>

              <content><![CDATA[a:1:{s:17:"banner_group_name";s:17:"Main Page Banners";}]]></content>

            </block_description>

          </block_descriptions>

          <installed>

            <placeholder>header_bottom</placeholder>

          </installed>

          <status>1</status>

          <position>20</position>

        </block>
<block_wrapper> property provides a custom template that you can include. This template will be loaded by banner system to display your banners' content. Notice, that group name is important to be specified to identify which banner(s) will be loaded for your banner block.
HTML Blocks
If you need to add ad blocks or any other HTML content that users can change, we recommend to use HTML blocks.
Static HTML content can be included in the block <content> and block XML included in the layout of desired page.
<block>
          <custom_block_txt_id>creditcardicons</custom_block_txt_id>
          <type>html_block</type>
          <block_descriptions>
            <block_description>
              <language>english</language>
              <name><![CDATA[Credit Card Icons]]></name>
              <title><![CDATA[Credit Card Icons]]></title>
              <block_wrapper><![CDATA[0]]></block_wrapper>
              <block_framed><![CDATA[0]]></block_framed>
              <description><![CDATA[HTML Block with credit card icons. ]]></description>
              <content><![CDATA[<ul class="card-icons">
    <li><a href="#" target="_blank" data-toggle="tooltip" data-placement="top" title="Paypal"><i class="fa fa-cc-paypal"></i></a></li>
    <li><a href="#" target="_blank" data-toggle="tooltip" data-placement="top" title="Mastercard"><i class="fa fa-cc-mastercard"></i></a></li>
    <li><a href="#" target="_blank" data-toggle="tooltip" data-placement="top" title="Visa"><i class="fa fa-cc-visa"></i></a></li>
    <li><a href="#" target="_blank" data-toggle="tooltip" data-placement="top" title="Discover"><i class="fa fa-cc-discover"></i></a></li>
    <li><a href="#" target="_blank" data-toggle="tooltip" data-placement="top" title="AMEX"><i class="fa fa-cc-amex"></i></a></li>
</ul>
]]></content>
            </block_description>
</block>
Form elements and fields template files
As you develop your template, you might need to change global HTML elements used by AbanteCart storefront.
HTML Template elements are located in .../template/form/ directory. Important to note, changes to these template will effect storefront of application globally.
Creating Extension package
If you plan to provide template to your customer installation or for redistribution, you need to create template as an extension.
If standard installation archive is created, extension can be installed in abantecart with simple click install.
Developer Tools extension will help you to create a standard extension archive. (Tar/GZ libraries need to be present for you PHP)
Please refer to extension development manual